Vulnerability management
Summary
Triage and evaluate security issues and CVEs using CVSS Environmental scores, the VEX cybersecurity standard, and SSVC assessments. Set statuses to prioritize and filter. Copy complete assessments from one analysis to another.
Firmware analyses surface a lot of vulnerabilities – vulnerability management is how you work through them systematically.
With ONEKEY you can follow a simple vulnerability management process:
- Assess vulnerabilities by setting statuses, comments, and enrichment fields (CVSS Environmental 1, VEX 2, SSVC 3) – individually, in bulk, or automatically using Analysis Profile.
- Use the Copy assessment function to carry forward a complete assessment when uploading a new version of a previously analyzed firmware.
The end result is an auditable record of what was found, assessed, and resolved – one that stays consistent across firmware versions.
Assess a vulnerability
As part of the analysis process, the platform automatically performs CVSS scoring, assigns a severity level, and sets the status to NONE or Not Affected – based on Automated Impact Assessment – for each vulnerability. If supporting evidence is available for the impact assessment decision, it is displayed under Notes and the Automated Impact Assessment tab.
To override automatic decisions and set a manual assessment:
- Select a firmware to enter Firmware analysis view.
- Click either the CVEs or Issues tab.
- Select a vulnerability to open the CVE/issue details.
- Click Edit.
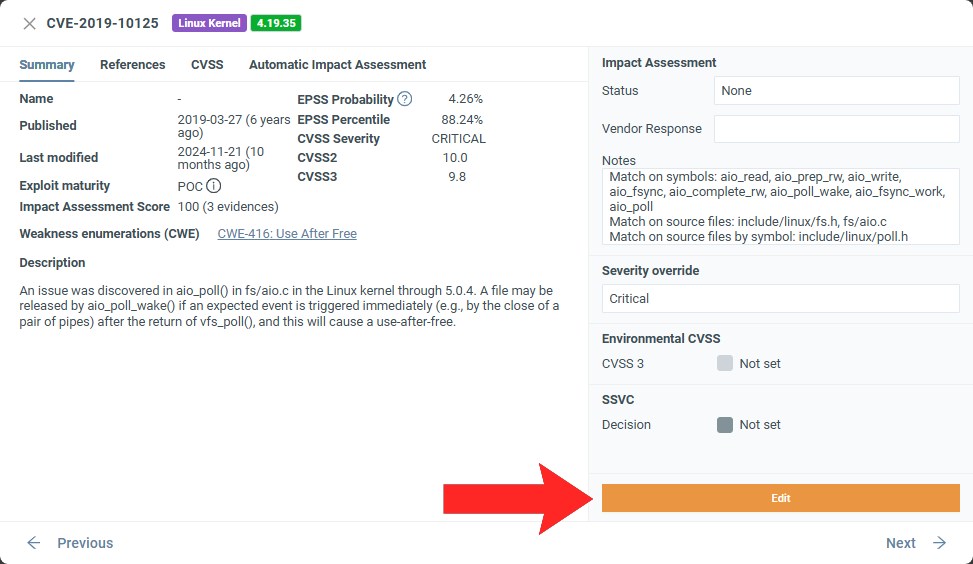
To update multiple vulnerabilities, check the box next to the issues or CVEs and click Set assessment.
To track past changes, see the Audit Trail page in Firmware analysis view.
Notes vs. Comments
Notes: They are associated with the vulnerability and can be automatically updated by Automated Impact Assessment; they do not appear in the Audit Trail unless a change has been made.
Comments: They appear exclusively in the Audit Trail and are not linked to the vulnerability itself – they are to explain why an update was made. They can be added manually or set automatically by Analysis Profile rules.
VEX
To follow recommended practices inspired by VEX and CycloneDX v1.6, set the Status, Vendor Response, and Justification fields.
Note
The Justification field only appears when you select a relevant status.
Assign a status
There are two main status categories: open (still being evaluated or acted upon) and closed (a final decision has been made).
Status reference
| Status | Description |
|---|---|
| None | Default. No assessment has been made yet. |
| Triage | Under active review; not yet prioritized. |
| Focus | Requires priority attention above other open items. |
| Status | Description |
|---|---|
| Accepted risk | The vulnerability is known and acknowledged, but the risk has been accepted. |
| Deferred | Will be addressed at a later time. |
| False positive | Incorrectly flagged; the vulnerability is not present. |
| Fixed | The vulnerability has been resolved. |
| Not affected | Confirmed not vulnerable. Set automatically by Automated Impact Assessment for non-relevant CVEs. |
Vulnerabilities with a closed status do not appear in the CVE or issue tables by default. To see closed vulnerabilities, uncheck Show only CVEs/issues with open status.
You can only set a status for issues/CVEs in the Firmware analysis view of a specific firmware, not on the global pages.
Severity override
ONEKEY automatically assigns a severity to each vulnerability based on the overall CVSS 3 score. You can override this to account for factors that are unique to your environment. To do so, select a new severity from the Severity override dropdown. The CVE/issue table will refresh once you close the details window.
Severity scores
| Severity | Severity Score Range |
|---|---|
| Informational | 0.0 |
| Low | 0.1-3.9 |
| Medium | 4.0-6.9 |
| High | 7.0-8.9 |
| Critical | 9.0-10.0 |
Environmental CVSS
A CVSS Environmental score reflects how a vulnerability's impact and exploitability can vary depending on where firmware is deployed. For example, firmware operating in a public environment can be more exposed to a vulnerability than in a closed environment; you can record this by assigning a higher CVSS Environmental score than the base score. (1)
- You can't set environmental score for CVEs that don't have a base score.
To add a CVSS environmental score, click Edit next to the relevant section and use the CVSS calculator. After you fill out the calculator, the vulnerability's severity will automatically update to reflect the environmental score, even if you previously set the severity manually with Severity override.(1)
- If you try to set different severity levels using both the override and the environmental score calculator in the same workflow, the severity override will take precedence.
SSVC
To perform an SSVC assessment, click Edit next to the relevant section and complete the SSVC calculator.
SSVC is especially useful when teams need to prioritize vulnerabilities based on more than just severity scores, as it incorporates contextual and stakeholder-specific factors. A good example would be organizations operating critical infrastructure (e.g., healthcare, energy, finance), where an exploitation could directly impact safety or disrupt core services.
VEX Import
Vendors, distributors, or suppliers can provide a VEX file containing a detailed vulnerability assessment. Importing a VEX file automatically updates vulnerability assessment fields with the corresponding vendor responses.
To import a VEX file:
- Select a firmware to open Firmware analysis view.
- Go to the CVEs page.
- Click Actions.
- Click Import VEX.
- Follow the on‑screen instructions.
You can select which CVEs you want to update; you do not need to update all of them.
After the file is imported, the platform adds an automatic comment to each affected vulnerability about the update.
Note
- Supported file formats are: OpenVEX JSON, CSAF JSON, and CycloneDX JSON. The supported versions are listed in the VEX upload dialog.
- On the import screen, all affected CVEs are displayed, whether they were manually edited before or not.
You can upload multiple VEX files at once, but only valid files are accepted; if an uploaded VEX file is invalid, the platform displays an error message and ignores the file.
If multiple uploaded VEX files affect the same vulnerability, the platform prompts you to choose which file to use for the update. To apply more than one VEX file to a single vulnerability, import them one by one rather than in a batch.
You can choose between Strict and Relaxed import modes, depending on how precisely you want to match the data.
Strict vs. Relaxed mode
Both the vulnerability identifier and the component details (vendor, product, and version, matched via CPE or PURL) must match a component detected in the firmware analysis.
Use this when the VEX file was produced for the exact firmware you are analyzing and you want to make sure assessments are only applied to the correct component version. If a VEX statement references a component that is not found in the firmware analysis – for example, because the version number differs – that statement is skipped and will not appear in the import list. An empty result list in Strict mode means the platform found the CVEs listed in the VEX file, but none of their associated component details matched what was detected in the firmware.
Only the vulnerability identifier must match. Component details in the VEX file are ignored.
Use this when the VEX file comes from a vendor and may use different component naming or versioning than what the firmware analysis detected, or when you want to apply a vendor's assessment to all occurrences of a CVE regardless of the specific component it was found in.
If you get results in Relaxed mode but not Strict mode, it means the vendor VEX file uses different component identifiers (CPE, PURL, or version strings) than what ONEKEY detected in the firmware. This is common; the VEX standard does not define canonical component identifiers, so vendor and analysis tool naming rarely align perfectly. Whether to apply the assessments is your call – evaluate whether it applies to your specific deployment.
VEX Export
Exporting VEX information can, for example, support compliance with certain cybersecurity regulations (such as the Cyber Resilience Act), as it provides documented statements of vulnerability assessments and mitigations.
To export a VEX‑enhanced SBOM:
- Select a firmware to open Firmware analysis view.
- Click Download SBOM.
- For the SBOM format, select CycloneDX.
- Select which details to include using the checkboxes.
Copy assessment
Use this feature to carry forward a complete vulnerability assessment – including status, justification, vendor response, notes, SSVC data, severity override, and CVSS Environmental scores – to a new firmware version without starting from scratch.
The copy process:
- Navigate to the Firmware analysis view of the target firmware.
- Select either the Issues or CVEs page, depending on what you want to copy.
- Click Actions.
- Click Copy assessment.
- Choose a source firmware in the popup by clicking Use as source.
- Select a pairing method and specify which vulnerability assessments to copy.
- Click Copy selected assessments.
Strict vs. Relaxed mode
Security Issues — all relevant details and the complete file path must be identical.
CVEs — the CVE ID, component name, version, and update must all match.
Security Issues — all relevant details must be identical, but only the file name – not the entire file path – needs to match.
CVEs — only the vulnerability identifier and the component name must match; component version is not checked.
Quick reference
| Feature | Details |
|---|---|
| Assessment fields | Per vulnerability you can set: status, justification, vendor response, notes, SSVC evaluation, CVSS Environmental score, and severity override. |
| Bulk assessment | Check multiple vulnerabilities and click Set assessment to update status, comments, and enrichment fields in one action. |
| Status scope | Statuses can only be set per-firmware – not on global CVE or issue pages. |
| VEX Import formats | OpenVEX JSON, CSAF JSON, and CycloneDX JSON. Supported versions are listed in the upload dialog. |
| Copy assessment | Copies the full assessment: status, justification, vendor response, notes, SSVC data, severity override, and CVSS Environmental scores. |
| Audit trail | All assessment changes are recorded per firmware in Firmware analysis view. |
-
Common Vulnerability Scoring System. A standardized framework for assessing the severity of software vulnerabilities by assigning a score from 0 to 10 based on factors like exploitability, impact, and environmental context. ↩
-
Vulnerability Exploitability eXchange. A form of a security advisory. VEX documents are machine readable and support more effective use of Software Bills of Materials (SBOM) data. ↩
-
Stakeholder-Specific Vulnerability Categorization. A decision-tree-based security framework that considers real-world factors like exploitation status, mission impact, and stakeholder roles, rather than relying solely on generic severity scores. ↩